Lesson 4: Your First Money Market Position
🎯 Core Concept: Start Simple, Start Safe
Your first money market position should be a learning experience, not a high-stakes gamble. This lesson walks you through setting up your first safe deposit, understanding the interface, and monitoring your position correctly.
The First-Time Participant Checklist
Before you deposit a single token, ensure you:
- ✅ Understand the basics (Lessons 1-3)
- ✅ Have calculated your risk tolerance
- ✅ Chosen a beginner-friendly protocol (Aave recommended)
- ✅ Have funds on Layer 2 (for lower gas costs)
- ✅ Know how to monitor your position
🏁 Step 1: Choose Your First Protocol
For Absolute Beginners: Start with Aave
Why Aave?
- ✅ Largest, most established protocol
- ✅ Extensive audits and safety track record
- ✅ Simple interface
- ✅ Insurance options available (Aave App)
- ✅ Largest liquidity pools
- ✅ Good documentation
Two Entry Paths:
Path A: Aave App (Recommended)
- Mobile app (iOS, Android)
- Insurance coverage up to $1M
- Simplified interface
- No gas management
- Best for: Saving/earning yield only
Path B: Aave V3 dApp
- Full-featured web interface
- Direct protocol interaction
- Can use crypto as collateral
- Best for: Borrowing or advanced strategies
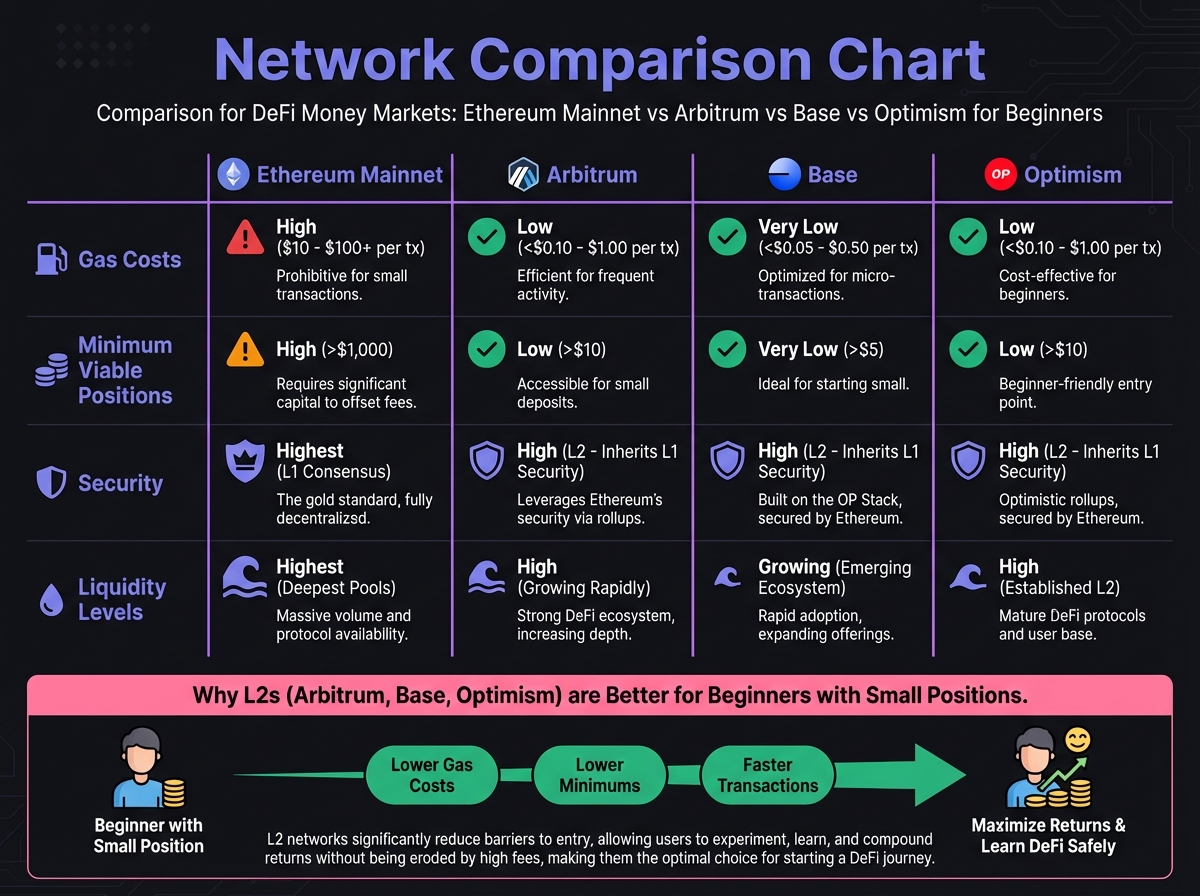
Alternative: Start on Layer 2
For your first position, use Arbitrum or Base:
- Lower gas costs (practice without high fees)
- Still large liquidity pools
- Same security as mainnet
- Better for learning and experimentation
🌐 Step 2: Choose Your Network
Network Selection Guide
Ethereum Mainnet:
- Gas costs: $20-100+ per transaction
- Only viable for: Large positions ($10k+)
- Best for: Maximum security, largest liquidity
- Not recommended for first position
Arbitrum (Recommended for beginners):
- Gas costs: $0.20-1.00 per transaction
- Viable for: Small positions ($100+)
- Security: Inherited from Ethereum
- Liquidity: Very high
- Best choice for learning
Base (Good alternative):
- Gas costs: $0.10-0.50 per transaction
- Viable for: Small positions
- Security: Inherited from Ethereum
- Liquidity: Growing rapidly
- Good for cost-sensitive beginners
Optimism:
- Gas costs: $0.15-0.80 per transaction
- Viable for: Small positions
- Similar to Arbitrum
Getting Funds on Layer 2
From Ethereum Mainnet:
- Use official bridge: Arbitrum Bridge or Base Bridge
- Bridge USDC or ETH
- Wait for confirmation (usually 10-15 minutes)
- Funds appear in your wallet on L2
From Centralized Exchange:
- Many exchanges support direct L2 withdrawals
- Withdraw USDC directly to Arbitrum/Base address
- Saves bridging step
💰 Step 3: Choose Your Asset
Start with Stablecoins
For your first position, only supply stablecoins (USDC, USDT, DAI).
Why Stablecoins First?
- ✅ No price volatility risk
- ✅ Can't get liquidated (you're not borrowing)
- ✅ Simple: deposit and earn yield
- ✅ Low risk learning experience
Recommended Stablecoins:
- USDC (USD Coin) - Most widely accepted
- USDT (Tether) - High liquidity
- DAI (Dai Stablecoin) - Decentralized alternative
What About Crypto Collateral?
Don't use crypto as collateral on your first position!
Wait until:
- You understand Health Factor monitoring
- You have experience monitoring positions
- You understand liquidation risks
- You're comfortable with volatility
Start simple: Supply USDC → Earn yield → Understand the system → Then explore borrowing later.
🔧 Step 4: Set Up Your Wallet
Wallet Options
MetaMask (Most Popular):
- Browser extension
- Mobile app available
- Supports all networks
- Good for beginners
WalletConnect-Compatible Wallets:
- Rainbow
- Coinbase Wallet
- Trust Wallet
- Works with many DeFi interfaces
Wallet Setup Checklist
-
Create or import wallet
- Write down seed phrase (store securely!)
- Never share seed phrase
- Consider hardware wallet for larger amounts
-
Add network
- Add Arbitrum network (if using Arbitrum)
- Add Base network (if using Base)
- Use chainlist.org for verified RPCs
-
Fund wallet
- Send small amount of ETH for gas
- Send USDC for your first deposit
- Keep extra ETH for gas fees
-
Verify security
- Check you're on correct network
- Bookmark official Aave website
- Be cautious of phishing sites
📱 Step 5: Make Your First Supply
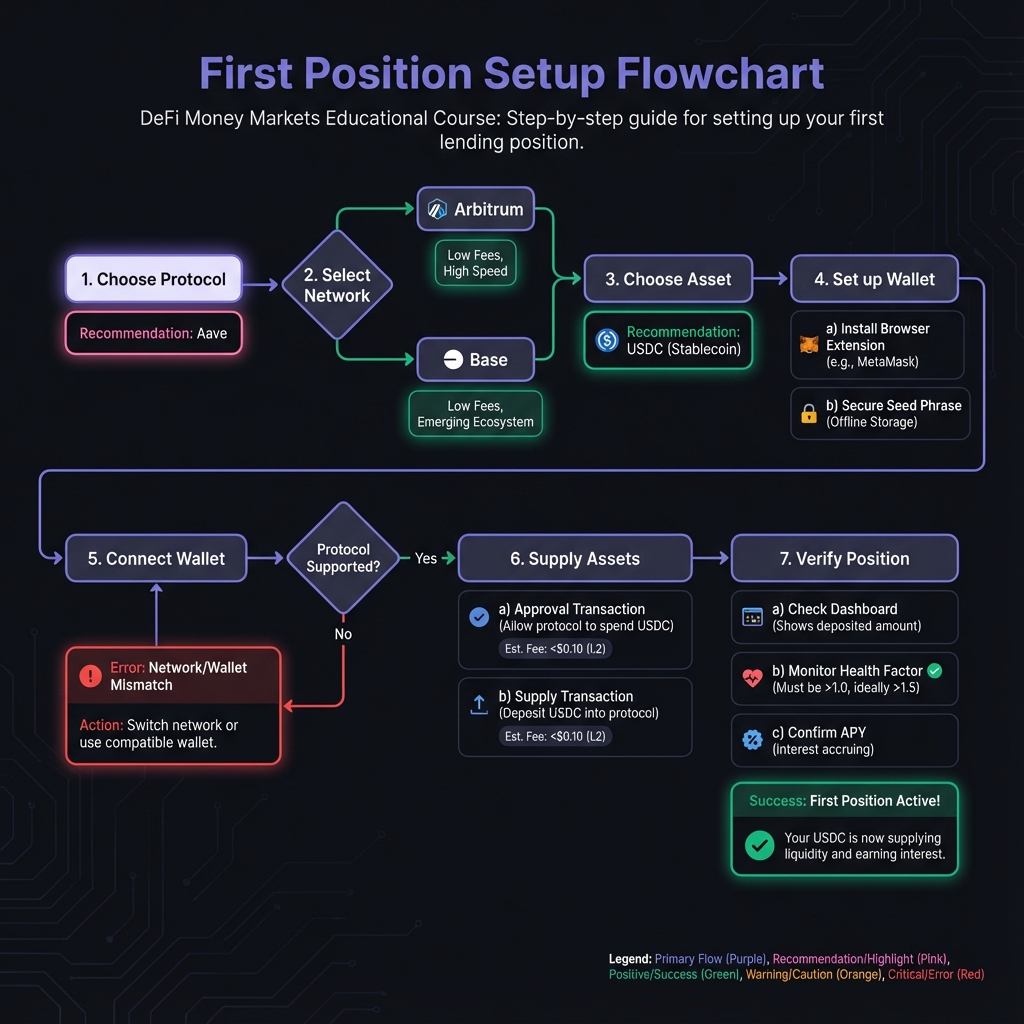
Using Aave V3 dApp (Step-by-Step)
1. Connect Wallet
- Go to app.aave.com
- Click "Connect Wallet"
- Select your wallet (MetaMask, etc.)
- Approve connection
2. Select Network
- Switch to Arbitrum (or your chosen L2)
- Confirm network switch in wallet
- Wait for interface to load
3. Navigate to Supply
- Click "Supply" tab in interface
- Browse available assets
- Select USDC (or your chosen stablecoin)
4. Enter Amount
- Enter amount you want to supply
- Interface shows:
- APY (annual percentage yield)
- Collateral status (toggle OFF for first position)
- Transaction details
5. Review Details
- Check APY rate
- Verify network (should be Arbitrum/Base, not Mainnet)
- Ensure "Use as Collateral" is OFF (for first position)
- Review gas estimate
6. Approve Token (First Time Only)
- Click "Approve" button
- Confirm transaction in wallet
- Wait for approval confirmation
- This allows Aave to access your USDC
7. Supply
- Click "Supply" button
- Review transaction details
- Confirm in wallet
- Wait for confirmation
8. Verify
- Check your wallet balance (should show aUSDC tokens)
- Return to Aave dashboard
- See your supplied balance
- Check your APY earnings
Understanding Receipt Tokens
When you supply assets, you receive receipt tokens:
- Supply USDC → Receive aUSDC (aToken USDC)
- These tokens represent your deposit + accrued interest
- Value increases over time as interest accrues
- Burn to withdraw: Burn aUSDC → Receive USDC + interest
Example:
- Supply 10,000 USDC
- Receive 10,000 aUSDC
- After 1 year at 5% APY
- aUSDC balance: ~10,500 (representing $10,500 value)
- Withdraw: Burn 10,500 aUSDC → Receive 10,500 USDC
📊 Step 6: Understanding Your Dashboard
Key Metrics to Monitor
Supply Balance:
- Your deposited amount
- Grows over time (interest accrues)
- Shows in both USDC and aUSDC terms
APY (Annual Percentage Yield):
- Current yield rate
- Changes based on utilization
- Can fluctuate daily
Total Value:
- Your position value
- Includes accrued interest
- Updates in real-time
Health Factor (if borrowing):
- Only relevant if you have loans
- For supply-only positions: N/A
- Monitor if you start borrowing later
Collateral Toggle: Critical Setting
"Use as Collateral" Toggle:
OFF (Recommended for First Position):
- ✅ Earn yield only
- ✅ Zero liquidation risk
- ✅ Cannot borrow (which is good for beginners)
- ✅ Position is 100% safe from liquidation
ON (Advanced):
- ✅ Can borrow against collateral
- ❌ Exposed to liquidation risk
- ❌ Requires active monitoring
- ❌ Not recommended for first position
For Your First Position: Keep this OFF. You're just learning to earn yield. Borrowing comes later.

💡 Monitoring Your Position
Daily Checklist
-
Check your balance
- Has your aToken balance increased?
- This confirms interest is accruing
-
Check APY
- Has the rate changed?
- Understand why (utilization changes)
-
Review dashboard
- Are there any warnings or alerts?
- Is everything functioning normally?
Weekly Review
-
Calculate returns
- Compare actual earnings to expected
- Understand compounding effect
-
Review protocol health
- Check utilization rates
- Monitor for any protocol updates
-
Assess strategy
- Are you comfortable with the risk?
- Ready to explore borrowing?
- Consider adding more funds?
Setting Up Alerts (Optional but Recommended)
Price Alerts:
- Set on CoinGecko or CoinMarketCap
- Alert if stablecoin depegs significantly
- Monitor for protocol issues
Protocol Alerts:
- Follow protocol Twitter/Discord
- Subscribe to governance updates
- Monitor security news
🎓 Beginner's Corner: Common First-Time Mistakes
Mistake 1: Supplying on Ethereum Mainnet
- Why it's wrong: Gas fees can be $50-100
- Fix: Use Arbitrum or Base for first positions
Mistake 2: Leaving "Use as Collateral" ON without understanding
- Why it's wrong: Creates liquidation risk
- Fix: Turn OFF for first position, learn borrowing later
Mistake 3: Not checking network
- Why it's wrong: Might supply on wrong network
- Fix: Always verify network in interface and wallet
Mistake 4: Supplying volatile crypto instead of stablecoins
- Why it's wrong: Unnecessary risk for first position
- Fix: Start with USDC only, learn the basics first
Mistake 5: Not monitoring position
- Why it's wrong: Need to verify everything works
- Fix: Check daily for first week, then weekly
Mistake 6: Approving unlimited token amounts
- Why it's wrong: Security risk if protocol compromised
- Fix: Approve only what you need (or use revoke.cash later)
🔬 Advanced Deep-Dive: Understanding aTokens
How aTokens Work
The Mechanism:
- When you supply USDC, Aave mints aUSDC tokens
- Your aUSDC balance = your deposit + interest
- Interest accrues continuously (every block)
- Value increases over time
The Formula: $$aToken Balance = Deposit Amount \times (1 + APY \times Time)$$
Example:
- Deposit: 10,000 USDC
- APY: 5%
- After 6 months: 10,000 × (1 + 0.05 × 0.5) = 10,250 aUSDC
Key Insight: You don't receive separate interest payments. The aToken itself increases in value.
Withdrawal Process
How to Withdraw:
- Navigate to "Withdraw" tab
- Select amount to withdraw
- Click "Withdraw"
- Confirm transaction
- aTokens are burned, USDC returned
Important: You can withdraw anytime (if liquidity available). No lockup periods.
📈 Real-World Example: Your First $1,000 Deposit
Setup:
- Deposit: $1,000 USDC
- Protocol: Aave V3 on Arbitrum
- APY: 5%
- Position: Supply only (collateral OFF)
Month 1:
- Starting balance: 1,000 aUSDC
- Interest earned: ~$4.17 (5% ÷ 12 months)
- Ending balance: ~1,004.17 aUSDC
- Value: $1,004.17
Month 6:
- Balance: ~1,025 aUSDC
- Total interest: ~$25
- Value: $1,025
Year 1:
- Balance: ~1,050 aUSDC
- Total interest: $50
- Value: $1,050
- Return: 5% APY
If APY Changes to 6% (utilization increases):
- Your position continues earning
- Rate updates automatically
- No action needed
- New earnings at 6% APY
Withdrawal (after 1 year):
- Burn 1,050 aUSDC
- Receive ~1,050 USDC
- Gas cost: ~$0.50 on Arbitrum
- Net profit: ~$49.50
⚠️ Important Safety Reminders
Before Your First Deposit
-
Verify website
- Always use official Aave site
- Check URL carefully
- Bookmark official site
-
Check network
- Confirm you're on correct network
- Don't mix mainnet and L2 addresses
-
Start small
- First deposit: $100-500
- Test the process
- Verify everything works
- Then scale up
-
Keep records
- Screenshot transaction hashes
- Record your aToken balance
- Track your earnings
After Your First Deposit
-
Verify in wallet
- Check you received aTokens
- Verify balance is correct
-
Check dashboard
- Position appears correctly
- APY is as expected
- No error messages
-
Test withdrawal (after a few days)
- Withdraw small amount
- Verify process works
- Confirm funds return correctly
🔑 Key Takeaways
- Start with Aave on Arbitrum/Base for lowest risk and gas costs
- Supply stablecoins only (USDC) for your first position
- Keep collateral OFF to avoid any liquidation risk
- Start small ($100-500) to learn the process
- Monitor daily for first week to ensure everything works
- Understand aTokens - they represent your deposit + interest
- Test withdrawal after a few days to verify the process
🚀 Next Steps
Now that you've set up your first position, Lesson 5 will dive deep into Aave's architecture, helping you understand the protocol you're using and prepare for more advanced strategies.
Complete Exercise 4 to track your first position and build your monitoring system.
Remember: Your first position is a learning experience. Start simple, start safe, and build your knowledge gradually. Once you're comfortable with supplying, you can explore borrowing and other protocols.
← Back to Summary | Next: Exercise 4 → | Previous: Lesson 3 ←