Lesson 4: Building Your First LP Position
🎯 Core Concept: Start Simple, Start Safe
Your first LP position should be a learning experience, not a high-stakes gamble. This lesson walks you through setting up a safe, profitable position on Uniswap V2 (the simplest version) that minimizes risk while teaching you the mechanics.
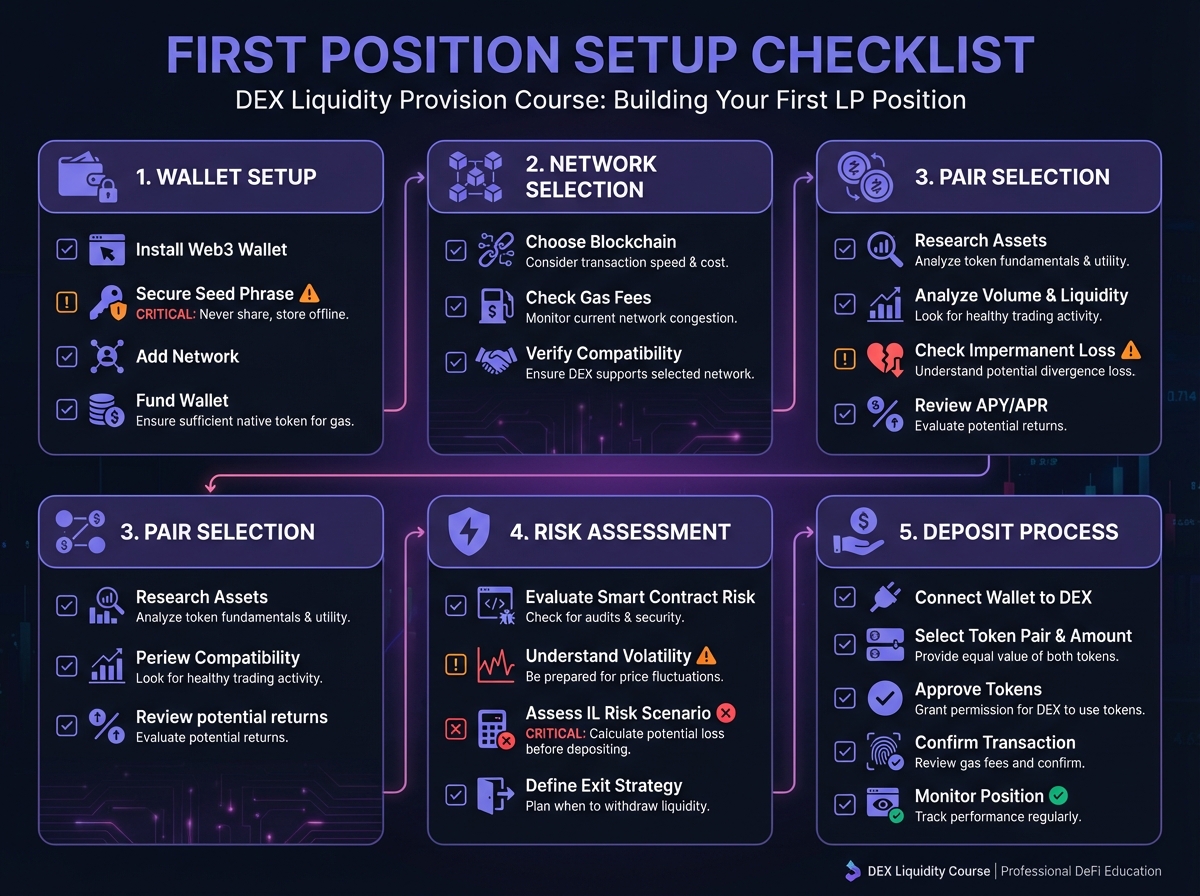
The First-Time LP Checklist
Before you deposit a single token, ensure you:
- ✅ Understand impermanent loss (Lesson 3)
- ✅ Have calculated expected fees vs. IL
- ✅ Chosen a low-risk pair (stablecoins or correlated assets)
- ✅ Have funds on Layer 2 (for lower gas costs)
- ✅ Know how to withdraw (practice on testnet first!)
🏁 Step 1: Choose Your Pair Wisely
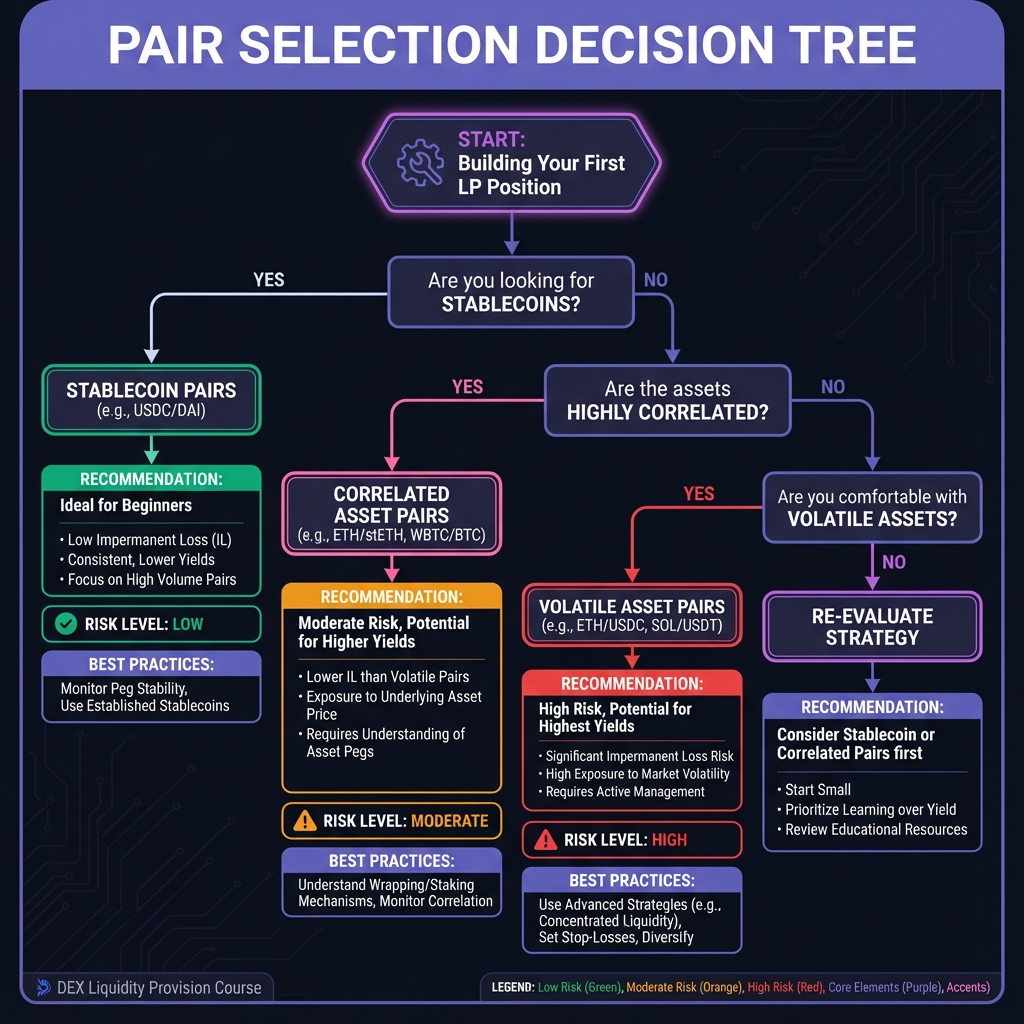
Beginner-Friendly Pairs (Lowest Risk)
Tier 1: Stablecoin Pairs ⭐ Best for beginners
- USDC/USDT
- DAI/USDC
- USDC/USDT.e (on L2s)
Why: Minimal IL (<0.1%), consistent fees, low volatility
Tier 2: Correlated Pairs ⭐⭐ Good for learning
- wstETH/ETH (wrapped staked ETH)
- WBTC/ETH
- ETH/BTC (on some DEXs)
Why: Ratio stays relatively stable, manageable IL
Tier 3: Blue Chip Pairs ⭐⭐⭐ Moderate risk
- ETH/USDC
- BTC/USDC
Why: Higher volatility = higher IL risk, but more fees
Avoid for First Position:
- ❌ Meme coins
- ❌ New tokens
- ❌ Low-liquidity pairs
- ❌ Uncorrelated volatile pairs
Pair Selection Framework
Ask yourself:
-
What's the historical volatility?
- Check price charts
- High volatility = high IL risk
-
What's the correlation?
- Do prices move together?
- Higher correlation = lower IL
-
What's the trading volume?
- More volume = more fees
- Check DEX analytics (Dune, DefiLlama)
-
What's the liquidity depth?
- Deeper pools = less price impact
- Check TVL (Total Value Locked)
🌐 Step 2: Choose Your Network
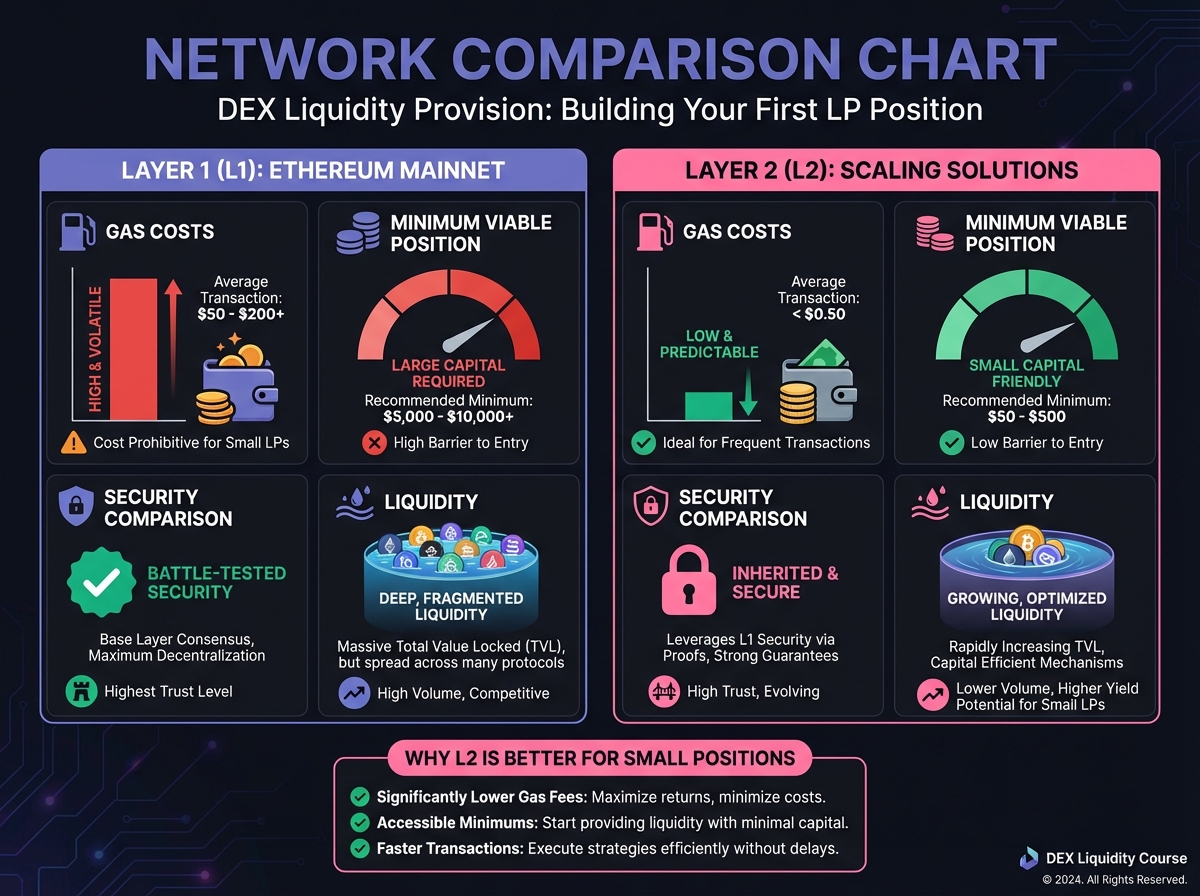
Layer 2 vs. Layer 1
Ethereum Mainnet (L1):
- ❌ High gas costs ($50-200 per transaction)
- ❌ Only viable for large positions ($50k+)
- ✅ Highest security
- ✅ Most liquidity
Layer 2 Solutions (Recommended for beginners):
- ✅ Low gas costs ($0.10-1.00 per transaction)
- ✅ Viable for small positions ($100+)
- ✅ Same security (inherited from L1)
- ✅ Growing liquidity
Recommended L2s for LPing
Arbitrum:
- Gas: ~$0.20 per transaction
- Liquidity: High (most L2 liquidity)
- Uniswap V2 and V3 available
Optimism:
- Gas: ~$0.15 per transaction
- Liquidity: Good
- Uniswap V2 and V3 available
Base:
- Gas: ~$0.10 per transaction
- Liquidity: Growing rapidly
- Aerodrome (ve-token model) available
Polygon:
- Gas: ~$0.01 per transaction
- Liquidity: Very high
- Multiple DEXs available
Recommendation: Start on Arbitrum or Optimism for best balance of liquidity and low fees.
💰 Step 3: Calculate Your Position Size
The 1% Rule (Beginners)
Never risk more than 1-5% of your portfolio on your first LP position.
Example:
- Portfolio: $10,000
- First position: $500 (5%)
- This limits your downside while you learn
Minimum Viable Position
On L2 (low gas):
- Minimum: $100-500
- Recommended: $1,000-5,000
- Optimal: $5,000-25,000
On L1 (high gas):
- Minimum: $25,000 (gas costs eat small positions)
- Recommended: $50,000+
- Optimal: $100,000+
Position Size Calculator
Formula:
Position Size = (Portfolio × Risk %) - (Gas Costs × Expected Transactions)
Example:
- Portfolio: $10,000
- Risk: 5% = $500
- Expected gas (L2): $5 for deposit + $5 for withdraw = $10
- Position size: $490
🔧 Step 4: Set Up Your Wallet
Required Setup
-
Install MetaMask (or similar wallet)
- Download from official site only!
- Set up seed phrase securely
- Never share your seed phrase
-
Add L2 Network
- Arbitrum: Chain ID 42161
- RPC: https://arb1.arbitrum.io/rpc
- Or use Chainlist.org (auto-adds networks)
-
Bridge Funds to L2
- Use official bridges (Arbitrum Bridge, Optimism Gateway)
- Or use third-party bridges (Orbiter, Stargate)
- Never use unknown bridges!
-
Get Test Tokens (Optional but recommended)
- Use testnet first (Goerli, Sepolia)
- Practice depositing/withdrawing
- Understand the interface
Security Checklist
- ✅ Hardware wallet for large amounts
- ✅ Separate wallet for DeFi (not your main wallet)
- ✅ Revoke unused token approvals (use Revoke.cash)
- ✅ Never share private keys
- ✅ Verify contract addresses before interacting
📱 Step 5: Navigate Uniswap Interface
Finding the Pool
- Go to app.uniswap.org
- Click "Pool" in the top menu
- Click "New Position" (V3) or "Add Liquidity" (V2)
For Your First Position: Use V2
Why V2 for beginners:
- Simpler interface
- No range selection needed
- Lower complexity
- Easier to understand
V2 Interface:
- Select token pair (e.g., USDC/USDT)
- Enter amount for one token
- Interface auto-calculates the other token
- Review the details
- Click "Add Liquidity"
Understanding the Interface
Key Information Displayed:
- Pool Share: Your % of total liquidity
- Fee Tier: 0.05% for stablecoins, 0.3% for volatile
- Price Range: Full range (0 to ∞) for V2
- Estimated Fees: Based on historical volume
Review Before Confirming:
- ✅ Token amounts are correct
- ✅ Pool share is reasonable (>0.01% for small positions)
- ✅ Gas estimate is acceptable
- ✅ You understand the risks
💸 Step 6: Execute Your Deposit
Pre-Deposit Checklist
- You have both tokens in your wallet
- You have ETH for gas (on L2, very little needed)
- You've reviewed the pool details
- You understand IL risks
- You've calculated expected returns
Transaction Steps
-
Approve Tokens (first time only)
- Click "Approve USDC" (or first token)
- Confirm in wallet
- Wait for confirmation
-
Approve Second Token
- Click "Approve USDT" (or second token)
- Confirm in wallet
- Wait for confirmation
-
Add Liquidity
- Click "Add Liquidity"
- Review transaction details
- Confirm in wallet
- Wait for confirmation (~30 seconds on L2)
-
Receive LP Tokens
- You'll receive LP tokens (ERC-20 on V2)
- These represent your share
- Store them safely (they're your proof of ownership)
Gas Optimization Tips
- Batch approvals: Approve both tokens in one session
- Use L2: 100x cheaper than L1
- Time your transactions: Gas varies (usually lower on weekends)
- Set gas limit: Don't let wallet auto-set (can be too high)
📊 Step 7: Monitor Your Position
What to Track
Daily:
- Current pool price
- Your LP token value
- Fees earned (increases LP token value)
Weekly:
- IL calculation (compare to holding)
- Fee earnings vs. IL
- Whether to rebalance or withdraw
Monthly:
- Total return (fees - IL - gas)
- Comparison to just holding
- Strategy adjustments
Monitoring Tools
Uniswap Interface:
- View your positions in "Pool" tab
- See current value and fees
Analytics Platforms:
- APY.vision: Track PnL, IL, fees
- Revert Finance: Backtest ranges, analyze positions
- Zapper.fi: Portfolio view across protocols
Manual Calculation:
- Track entry price
- Calculate current IL
- Compare to holding value
🔄 Step 8: Withdrawing Your Position
When to Withdraw
Good reasons:
- ✅ IL exceeds fees (losing money)
- ✅ Better opportunities elsewhere
- ✅ Need the capital
- ✅ Price moved significantly (large IL)
Bad reasons:
- ❌ Temporary price dip (wait for recovery)
- ❌ FOMO on another opportunity (do research first)
- ❌ Panic (emotional decisions lose money)
Withdrawal Process
- Go to Uniswap Pool interface
- Find your position
- Click "Remove Liquidity"
- Choose amount (100% or partial)
- Review what you'll receive
- Confirm transaction
- Receive tokens back to wallet
Note: You'll receive both tokens back, not necessarily in the ratio you deposited (due to IL and price changes).
🎓 Beginner's Corner: Common First-Time Mistakes
Mistake 1: Depositing too much
- Fix: Start small (1-5% of portfolio)
Mistake 2: Choosing volatile pairs
- Fix: Start with stablecoins
Mistake 3: Ignoring gas costs
- Fix: Use L2, calculate total costs
Mistake 4: Not tracking IL
- Fix: Use analytics tools, calculate weekly
Mistake 5: Panic withdrawing
- Fix: Set rules, stick to them
Mistake 6: Not understanding fees
- Fix: Read Lesson 2, calculate expected fees
Mistake 7: Using L1 for small positions
- Fix: Always use L2 for positions <$25k
🔬 Advanced Deep-Dive: Optimizing Your First Position
Fee Tier Selection
For Stablecoins:
- Use 0.01% tier (if available)
- Or 0.05% tier
- Never use 0.3% (traders will bypass you)
For Volatile Pairs:
- Use 0.05% for high volume
- Use 0.3% for moderate volume
- Use 1% only for very volatile/exotic pairs
Volume/TVL Ratio Analysis
Calculate:
Volume/TVL Ratio = Daily Volume ÷ Total Value Locked
Interpretation:
- Ratio > 0.5: Excellent (high fees per dollar)
- Ratio 0.1-0.5: Good
- Ratio < 0.1: Poor (low fees, avoid)
Example:
- Pool TVL: $10,000,000
- Daily Volume: $2,000,000
- Ratio: 0.2 (Good)
Timing Your Entry
Best Times:
- After large price movements (IL already occurred)
- During low volatility periods
- When volume is increasing
Worst Times:
- Right before major events (high volatility expected)
- During extreme volatility
- When volume is declining
📈 Real-World Example: Complete First Position
Setup:
- Network: Arbitrum
- Pair: USDC/USDT
- Position: $1,000 (50% USDC, 50% USDT)
- Fee Tier: 0.05%
Execution:
- Bridge $1,100 to Arbitrum (extra for gas)
- Swap to get 500 USDC + 500 USDT
- Approve both tokens (~$0.50 gas)
- Add liquidity (~$0.50 gas)
- Receive LP tokens
Monitoring (After 1 month):
- Fees earned: ~$2 (0.2% of position)
- IL: ~$0.10 (minimal for stablecoins)
- Net return: $1.90 (0.19% monthly = 2.3% APY)
- Gas costs: $1.00 (one-time)
Analysis:
- ✅ Profitable (fees > IL + gas)
- ✅ Low risk (stablecoin pair)
- ✅ Good learning experience
Decision: Continue position, or move to V3 for higher efficiency (Lesson 5).
Interactive LP Position Simulator
Use this simulator to practice setting up your first LP position and see how different parameters affect your returns:

Launch LP Position Simulator →
🔑 Key Takeaways
- Start with stablecoins on L2 for lowest risk
- Use V2 for your first position (simpler)
- Risk only 1-5% of portfolio initially
- Monitor IL weekly using analytics tools
- Calculate fees vs. IL before depositing
- Practice on testnet before using real funds
- Use L2 to minimize gas costs
🚀 Next Steps
Congratulations! You've set up your first LP position. In Module 2, we'll explore:
- Uniswap V3 concentrated liquidity (higher efficiency, more complexity)
- Multi-protocol strategies
- Advanced fee optimization
- Professional risk management
Complete Exercise 4 to document your first position and track its performance.
Remember: Your first position is for learning. Start small, start safe, and track everything. The experience you gain is worth more than the fees you'll earn.
← Back to Summary | Next: Exercise 4 → | Previous: Lesson 3 ←