Lesson 6: Multi-Protocol Strategy Development
🎯 Core Concept: One Size Doesn't Fit All
Different DEX protocols excel in different scenarios. Mastering multiple protocols lets you optimize returns across ecosystems, chains, and market conditions. This lesson compares Uniswap, Aerodrome, Raydium, Orca, and Meteora to help you choose the right tool for each situation.
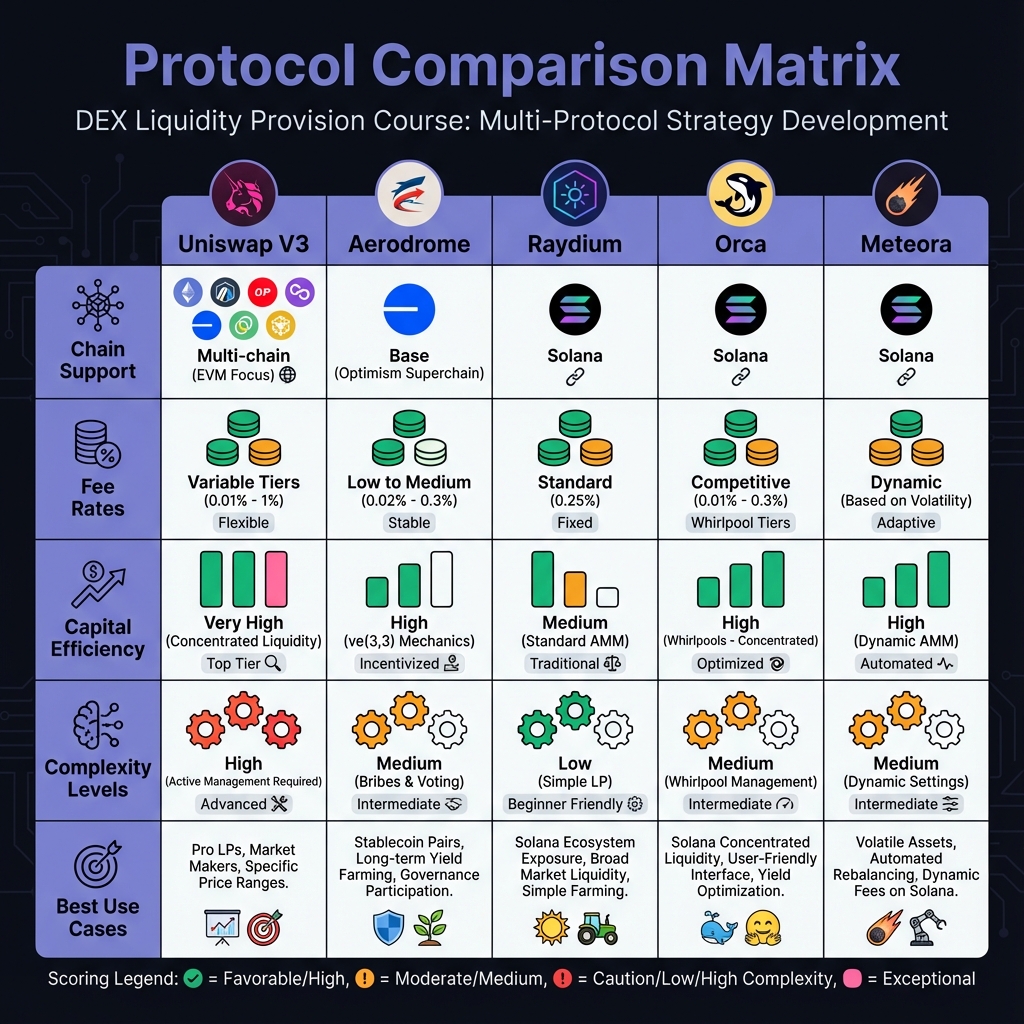
🏛️ Protocol Comparison Framework
When to Use Each Protocol
Uniswap V3:
- ✅ Ethereum and L2s (Arbitrum, Optimism, Base)
- ✅ Maximum control over ranges
- ✅ Highest liquidity on Ethereum
- ❌ Complex, requires active management
- ❌ High gas on L1
Aerodrome (Base):
- ✅ Base ecosystem (growing rapidly)
- ✅ High emissions yields (ve-token model)
- ✅ Stablecoin pairs (sAMM)
- ❌ Governance complexity
- ❌ Emissions can decline
Raydium (Solana):
- ✅ Solana ecosystem
- ✅ Permissionless pool creation
- ✅ Hybrid AMM + order book
- ❌ Solana-specific risks
- ❌ Lower liquidity than Ethereum
Orca (Solana):
- ✅ User-friendly interface
- ✅ Concentrated liquidity (Whirlpools)
- ✅ Good for beginners on Solana
- ❌ Less volume than Raydium
Meteora (Solana):
- ✅ Advanced liquidity shapes
- ✅ Dynamic fees
- ✅ Zero slippage within bins
- ❌ Most complex
- ❌ Smaller ecosystem
💰 Aerodrome: The ve-Token Model
Understanding ve(3,3) Economics
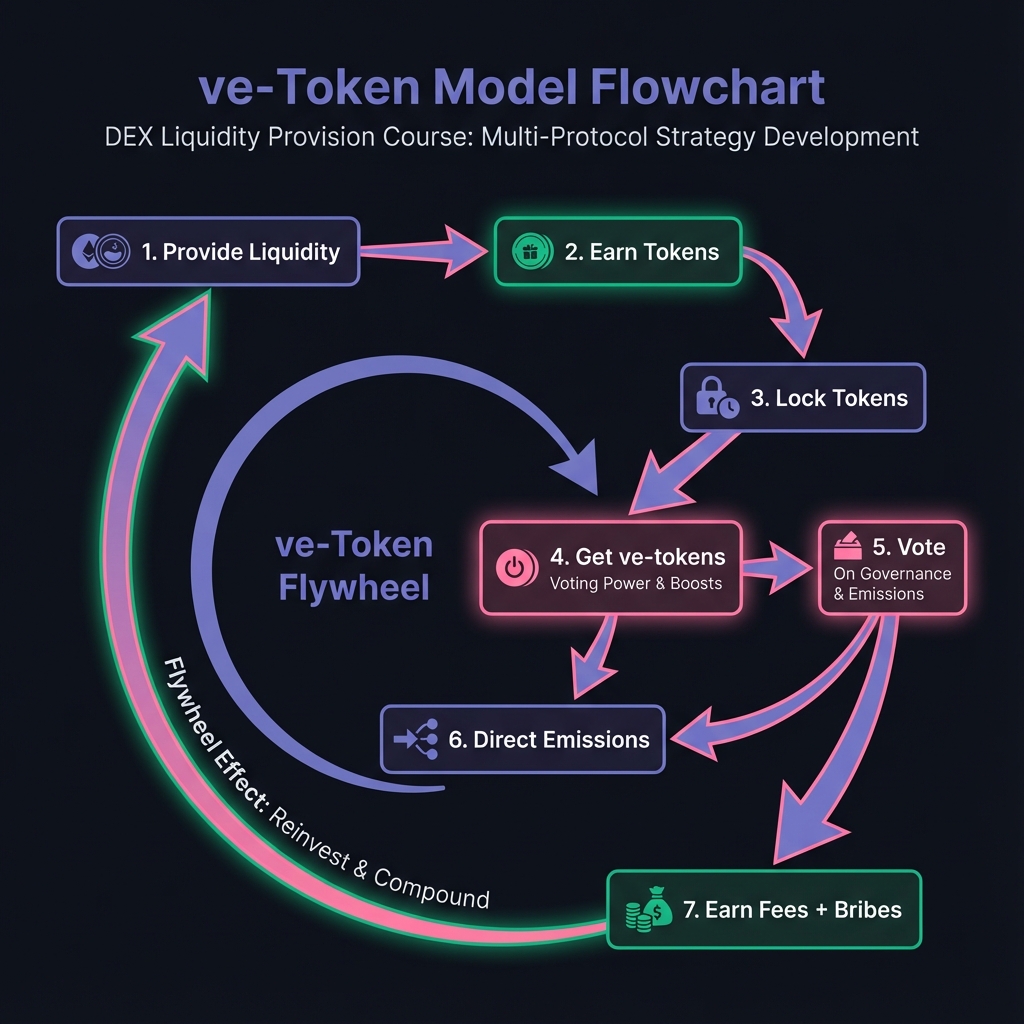
Aerodrome uses vote-escrowed tokens (veAERO) to align long-term incentives:
How It Works:
- Lock AERO tokens → Get veAERO (NFT)
- Vote with veAERO → Direct emissions to pools
- Earn fees + emissions from voted pools
- Receive bribes from protocols
The Flywheel:
- Protocols bribe voters → Voters direct emissions → Deep liquidity → Trading fees → Rewards voters
Strategy for LPs
Step 1: Identify high-emission pools
- Check current epoch voting results
- Look for pools with high vote share
- Monitor bribe efficiency (emissions per $1 bribed)
Step 2: Provide liquidity
- Choose vAMM (volatile) or sAMM (stable) pool type
- Critical: Must stake LP tokens in gauge to earn rewards
Step 3: Lock and vote (advanced)
- Earn AERO from liquidity provision
- Lock AERO for veAERO
- Vote for your own pools
- Self-reinforcing yield increase
Bribe Efficiency Analysis
Formula: Bribe Efficiency = Emissions Generated ÷ Bribes Paid
Interpretation:
- Ratio > 1: Profitable for protocols (sustainable)
- Ratio < 1: Unsustainable (emissions may decline)
Best Practice: Monitor bribe efficiency weekly. High efficiency = healthy ecosystem.
⚡ Raydium: Solana's Liquidity Hub
Hybrid Architecture Advantage
Raydium's unique feature: AMM liquidity projected onto order book
Benefit: LPs capture both:
- AMM swap volume
- Order book limit orders
Result: More volume = more fees than pure AMMs
CLMM on Raydium
Tick Spacing Selection:
- 1 tick (0.01%): Stable pairs (USDC/USDT)
- 8-16 ticks: Correlated pairs (SOL/mSOL)
- 64-128 ticks: Volatile pairs (SOL/USDC, memecoins)
Workflow:
- Connect Solana wallet (Phantom, Backpack)
- Navigate to "Liquidity" → "Concentrated"
- Set price range (visual interface)
- Deposit (single-sided if range above/below price)
Volume Dominance
Raydium captures 55%+ of Solana DEX volume via Jupiter aggregator. This ensures consistent fee generation even in smaller pools.
🌊 Meteora: Dynamic Liquidity Shapes
The Bin System
Unlike continuous curves, Meteora uses discrete bins:
- Each bin has fixed price
- Only active bin (current price) earns fees
- Zero slippage within single bin
Liquidity Shapes
Spot Shape (Uniform):
- Equal liquidity across all bins
- Best for: Ranging markets, beginners
- Risk: Lower efficiency
Curve Shape (Gaussian):
- Concentrated around current price
- Best for: Stable pairs, mean-reverting assets
- Risk: High if price breaks out
Bid-Ask Shape (Inverse):
- Concentrated at range edges
- Best for: Volatile assets, capturing breakouts
- Risk: Low fees if price stays stable
Dynamic Fees
Meteora adjusts fees based on:
- Volatility
- Utilization
- Market conditions
Benefit: LPs earn more during high volatility (compensating for IL risk)
📊 Protocol Selection Matrix
| Factor | Uniswap V3 | Aerodrome | Raydium | Orca | Meteora |
|---|---|---|---|---|---|
| Chain | Ethereum/L2s | Base | Solana | Solana | Solana |
| Complexity | High | Medium | Medium | Low | Very High |
| Best For | Control | Emissions | Volume | Beginners | Advanced |
| Gas Costs | High (L1) | Low | Very Low | Very Low | Very Low |
| Liquidity | Highest | Growing | High | Medium | Lower |
🎯 Multi-Protocol Strategy
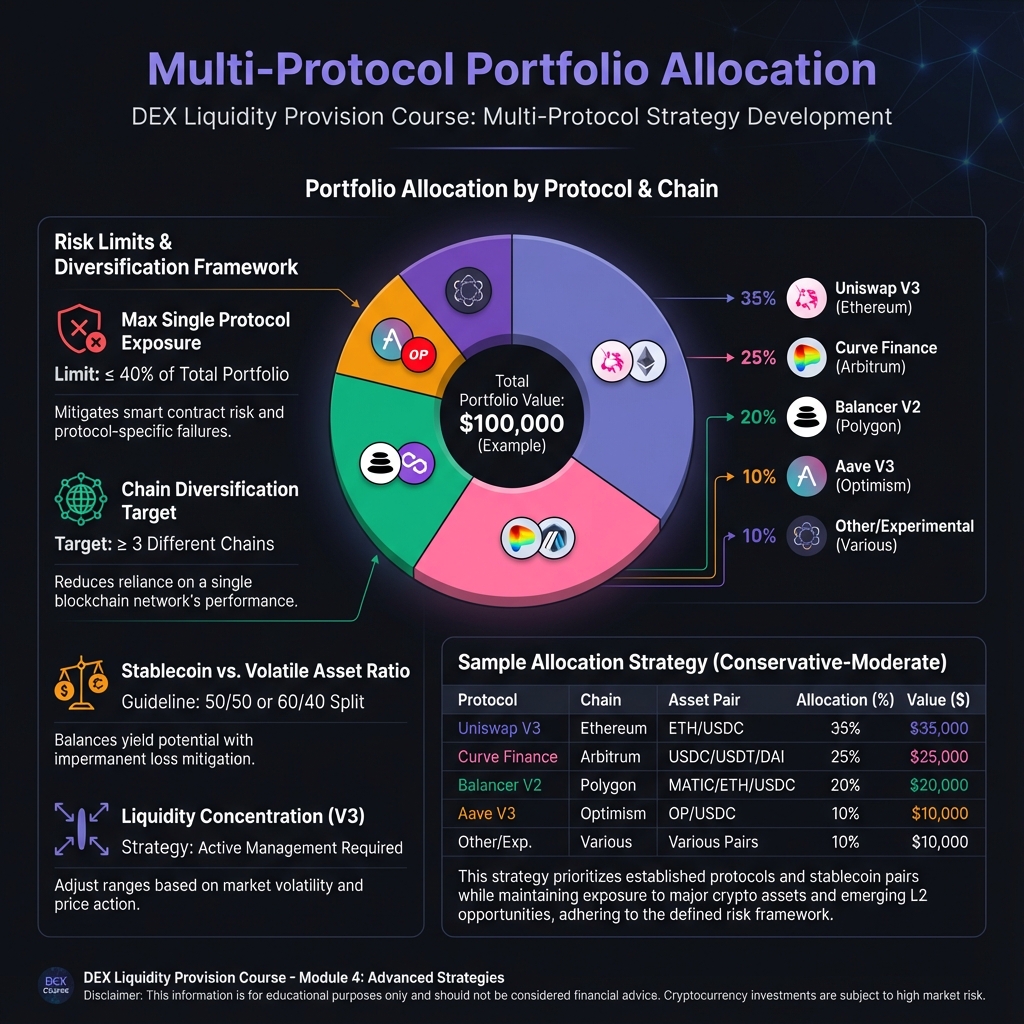
Strategy 1: Chain Diversification
Allocate across chains:
- 40% Ethereum/L2s (Uniswap) - highest liquidity
- 30% Base (Aerodrome) - high emissions
- 30% Solana (Raydium/Orca) - low fees, high speed
Benefit: Reduces single-chain risk, captures opportunities across ecosystems
Strategy 2: Pair Optimization
Stablecoins:
- Aerodrome sAMM (Base) - best slippage
- Orca (Solana) - low fees
Volatile Pairs:
- Uniswap V3 (Ethereum) - most liquidity
- Raydium (Solana) - hybrid volume
Correlated Pairs:
- Uniswap V3 - best range management
- Meteora Curve shape - maximum efficiency
Strategy 3: Yield Maximization
High Emissions (short-term):
- Aerodrome pools with high votes
- Monitor bribe efficiency
Sustainable Fees (long-term):
- Uniswap V3 high-volume pairs
- Raydium dominant pools
Advanced Strategies:
- Meteora dynamic shapes
- Multi-position management
🔬 Advanced Deep-Dive: Cross-Chain Arbitrage
The Opportunity
Different protocols on different chains can have price discrepancies. Advanced LPs can:
- Provide liquidity on multiple chains
- Monitor price differences
- Arbitrage between chains (if you have capital on both)
Example: ETH/USDC pool
- Uniswap (Arbitrum): $2,000
- Raydium (Solana): $2,010
- Opportunity: Buy on Arbitrum, sell on Solana
Note: Requires bridging capital, understanding both ecosystems, and managing gas costs.
🎓 Beginner's Corner: Which Protocol Should I Start With?
If you're on Ethereum/L2s:
- Start with Uniswap V2 (simplest)
- Move to Uniswap V3 when comfortable
If you're on Base:
- Start with Aerodrome stablecoin pools
- Learn ve-token mechanics gradually
If you're on Solana:
- Start with Orca (easiest interface)
- Move to Raydium for more volume
Avoid initially:
- ❌ Meteora (too complex)
- ❌ Cross-chain strategies (too advanced)
- ❌ Governance participation (learn basics first)
📈 Real-World Multi-Protocol Example
Portfolio: $50,000 across 3 chains
Allocation:
- $20,000 Uniswap V3 (Arbitrum): ETH/USDC ±10% range
- $15,000 Aerodrome (Base): WETH/USDC sAMM pool (staked in gauge)
- $15,000 Raydium (Solana): SOL/USDC CLMM ±15% range
Monthly Returns:
- Uniswap: $200 fees, $50 IL = $150 net (0.75%)
- Aerodrome: $300 emissions, $20 fees, $10 IL = $310 net (2.07%)
- Raydium: $180 fees, $40 IL = $140 net (0.93%)
Total: $600 net (1.2% monthly = 14.4% APY)
Analysis: Diversification across chains and protocols reduces risk while capturing opportunities in each ecosystem.
Interactive Pool Health Analyzer
Use this tool to compare pool health metrics across different protocols and chains to inform your multi-protocol strategy:

🔑 Key Takeaways
- Different protocols excel in different scenarios - learn multiple
- Aerodrome offers high emissions but requires governance understanding
- Raydium dominates Solana volume with hybrid architecture
- Meteora provides advanced strategies for sophisticated LPs
- Multi-chain diversification reduces risk and captures opportunities
- Start simple - master one protocol before expanding
- Monitor protocol-specific metrics (bribe efficiency, volume share, etc.)
🚀 Next Steps
Lesson 7 covers fee optimization and gas economics - critical for maximizing returns across all protocols. Understanding when fees justify gas costs is essential for profitable LPing.
Complete Exercise 6 to analyze and compare different protocols for your specific situation.
Remember: No single protocol is best for everything. Master multiple protocols, and you'll optimize returns across market conditions and ecosystems.
← Back to Summary | Next: Exercise 6 → | Previous: Lesson 5 ←