Lesson 4: Your First Perpetual Position
🎯 Core Concept: Start Simple, Start Safe
Your first perpetual position should be a learning experience, not a high-stakes gamble. This lesson walks you through setting up a safe, low-leverage position that minimizes risk while teaching you the mechanics.
The First-Time Trader Checklist
Before you open a single position, ensure you:
- ✅ Understand funding rates (Lesson 1)
- ✅ Can calculate liquidation prices (Lesson 2)
- ✅ Know the difference between isolated and cross margin
- ✅ Have funds on the correct network (L2 or AppChain)
- ✅ Know how to close positions (practice on testnet first!)
🏁 Step 1: Choose Your Protocol
Beginner-Friendly Protocols
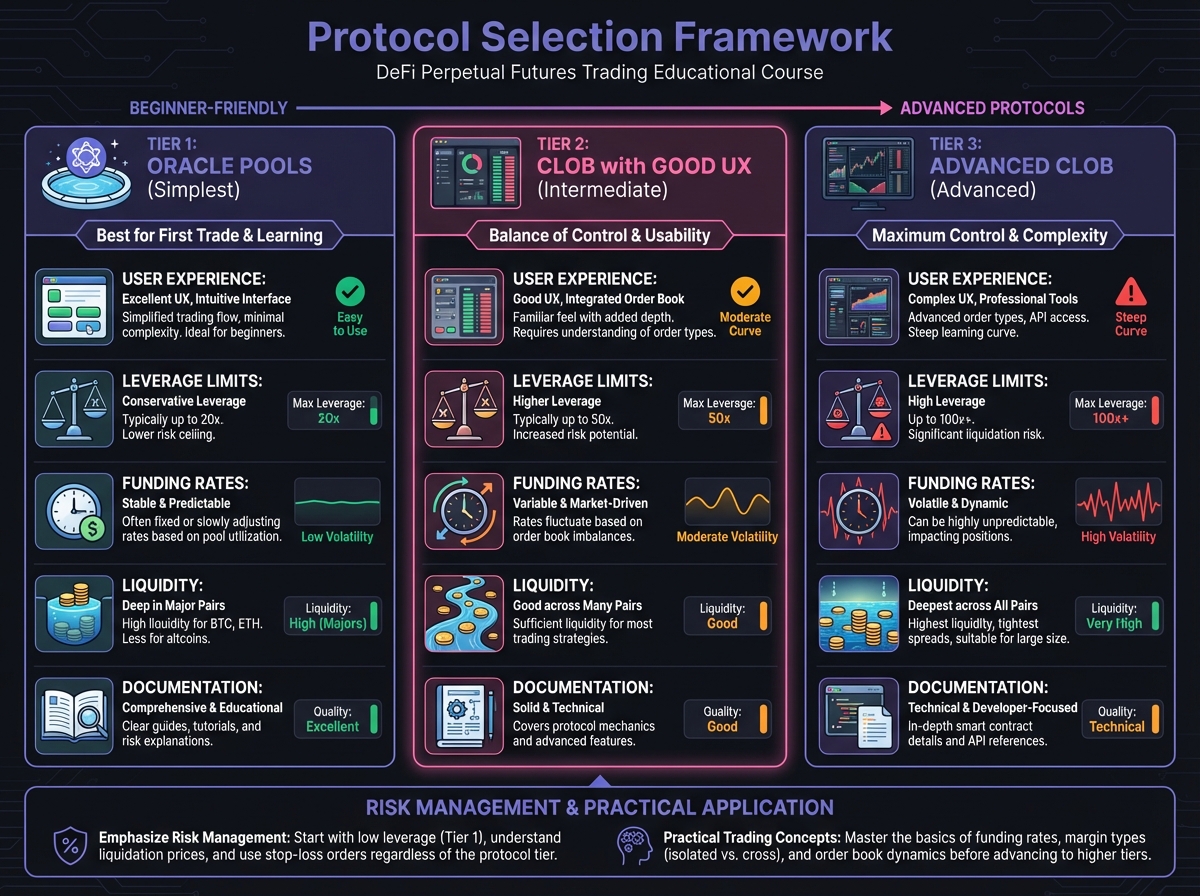
Tier 1: Oracle Pools (Simplest) ⭐ Best for beginners
- GMX V2 (Arbitrum)
- Gains Network (Polygon)
Why: Simple swap-like interface, zero slippage, no order book complexity
Tier 2: CLOB with Good UX ⭐⭐ Good for learning
- Hyperliquid (AppChain)
- Drift (Solana)
Why: CEX-like experience, limit orders, but requires understanding order books
Tier 3: Advanced CLOB ⭐⭐⭐ For experienced traders
- dYdX v4 (Cosmos)
- EdgeX (Starknet)
Why: More features, but more complexity
Avoid for First Position:
- ❌ Protocols with very high leverage (50x+)
- ❌ Protocols with unclear liquidation mechanics
- ❌ Protocols with poor documentation
- ❌ Protocols on unfamiliar chains
Protocol Selection Framework
Ask yourself:
-
What's the user experience?
- Is the interface intuitive?
- Are there tutorials or guides?
-
What's the leverage limit?
- Start with protocols that cap leverage at 10x
- Avoid 50x+ for first trades
-
What's the funding rate?
- Check current funding rates
- High funding = expensive to hold
-
What's the liquidity?
- More liquidity = better execution
- Check TVL and open interest
🌐 Step 2: Wallet Setup and Network Configuration
Choose Your Wallet
EVM-Compatible (for Arbitrum, Optimism, Base):
- MetaMask (most popular)
- Rabby (multi-chain optimized)
- Coinbase Wallet
Cosmos (for dYdX v4):
- Keplr (recommended)
- MetaMask (with Cosmos support)
Solana (for Drift):
- Phantom
- Solflare
Network Configuration
For GMX (Arbitrum):
- Open MetaMask
- Click network dropdown
- Add network manually or use Chainlist.org
- Network details:
- Network Name: Arbitrum One
- RPC URL: https://arb1.arbitrum.io/rpc
- Chain ID: 42161
- Currency: ETH
- Block Explorer: https://arbiscan.io
For Hyperliquid:
- Connect MetaMask (Arbitrum network)
- Navigate to Hyperliquid interface
- Click "Connect Wallet"
- Sign message to enable trading (session keys)
Acquire Assets
Option 1: Bridge from CEX
- Buy USDC on centralized exchange
- Withdraw to Ethereum Mainnet
- Bridge to target network (Arbitrum, Optimism, etc.)
- Use official bridge or third-party (Synapse, Stargate)
Option 2: Swap on DEX
- Have ETH on target network
- Swap ETH for USDC on Uniswap or similar
- Use USDC as collateral
Gas Considerations:
- Keep some ETH/native token for gas
- L2s require minimal gas ($0.10-1.00)
- AppChains may have zero gas (Hyperliquid)
💰 Step 3: Deposit Collateral
For Oracle Pools (GMX)
- Navigate to GMX interface
- Click "Connect Wallet"
- Select "Deposit" tab
- Choose asset (USDC recommended for beginners)
- Enter amount (start small: $100-500)
- Click "Deposit"
- Approve transaction in wallet
- Wait for confirmation
For CLOB (Hyperliquid)
- Navigate to Hyperliquid interface
- Connect wallet
- Enable trading (sign message for session keys)
- Click "Deposit"
- Enter amount (USDC.e from Arbitrum)
- Approve bridge transaction
- Wait for confirmation (may take a few minutes)
Important: Hyperliquid uses a bridge—this is a trust point. Funds are locked in bridge contract.
📊 Step 4: Analyze Before You Trade
Check Funding Rate
Why It Matters: High funding rates can eat your profits
How to Check:
- Navigate to market page
- Look for "Funding Rate" or "Funding"
- Check if positive (you pay) or negative (you receive)
- Calculate annualized rate
Red Flags:
- Funding rate > 0.05% per hour (very expensive)
- Annualized > 50% (extremely expensive)
- Consider waiting or choosing different market
Check Open Interest
Why It Matters: High OI = active market, low OI = risky
How to Check:
- Look for "Open Interest" or "OI" metric
- Compare to historical averages
- Check OI trend (increasing = healthy)
Warning Signs:
- OI suddenly dropping (liquidity leaving)
- OI very low (illiquid market)
- OI extremely high (crowded trade, high funding)
Check Liquidation Price
Before Opening Position:
- Use protocol's liquidation calculator
- Enter your planned margin and leverage
- Note the liquidation price
- Check if you have 20-30% buffer
Example:
- Entry: $2,500
- Leverage: 5x
- Liquidation: ~$2,000
- Buffer: 20% (safe)
🎯 Step 5: Configure Your Position
Choose Market
For Beginners: Start with major pairs
- ETH/USD
- BTC/USD
Why: Most liquid, lowest funding rates, most stable
Avoid:
- Meme coins
- Low-liquidity pairs
- Exotic assets
Choose Direction
Long: Betting price goes up
- Use when bullish
- Pay funding if rate is positive
Short: Betting price goes down
- Use when bearish
- Receive funding if rate is positive
For First Trade: Choose direction based on clear technical or fundamental analysis, not emotion.
Choose Margin Mode
Isolated Margin (Recommended for beginners):
- ✅ Limited risk (only margin at risk)
- ✅ Easy to understand
- ✅ Safe for learning
Cross Margin (Advanced):
- ❌ Entire account at risk
- ❌ Can liquidate all positions
- ✅ Better for hedging strategies
For First Trade: Always use isolated margin.
Choose Leverage
Beginner Leverage:
- 2x-3x: Very safe, low risk
- 4x-5x: Moderate risk, recommended
- 6x-10x: Higher risk, for experienced
Calculation:
- 5x leverage = 20% price move = liquidation
- 10x leverage = 10% price move = liquidation
For First Trade: Start with 3x-5x maximum.
Set Position Size
Rule of Thumb: Risk only 1-5% of total capital per trade
Example:
- Total Capital: $10,000
- Risk Per Trade: 2% = $200
- Margin: $200
- Leverage: 5x
- Position Size: $1,000
Why Small: First trades are for learning, not profit maximization.
📝 Step 6: Place Your Order
Order Types
Market Order (Oracle Pools):
- Executes immediately at oracle price
- Zero slippage (on oracle pools)
- Simple, one-click execution
Limit Order (CLOB):
- Executes only at your specified price
- May not fill if price doesn't reach your level
- Better control, but requires patience
For First Trade: Use market order (simpler) or limit order close to current price.
Set Stop Loss
Why Critical: Limits your maximum loss
How to Set:
- Identify technical support/resistance
- Set stop loss below support (long) or above resistance (short)
- Ensure stop loss is 20-30% away from entry (for 5x leverage)
Example:
- Entry: $2,500
- Support: $2,400
- Stop Loss: $2,390 (below support)
- Max Loss: $110 (4.4% of position, 22% of margin)
For First Trade: Always set a stop loss.
Set Take Profit (Optional)
Why Useful: Locks in profits automatically
How to Set:
- Identify technical target
- Set take profit at target
- Consider partial profits (close 50% at first target)
For First Trade: Optional, but good practice.
Review Before Submitting
Final Checklist:
- Funding rate acceptable?
- Leverage appropriate (3x-5x)?
- Margin mode: Isolated?
- Stop loss set?
- Position size reasonable?
- Liquidation price checked?
- Have 20-30% buffer?
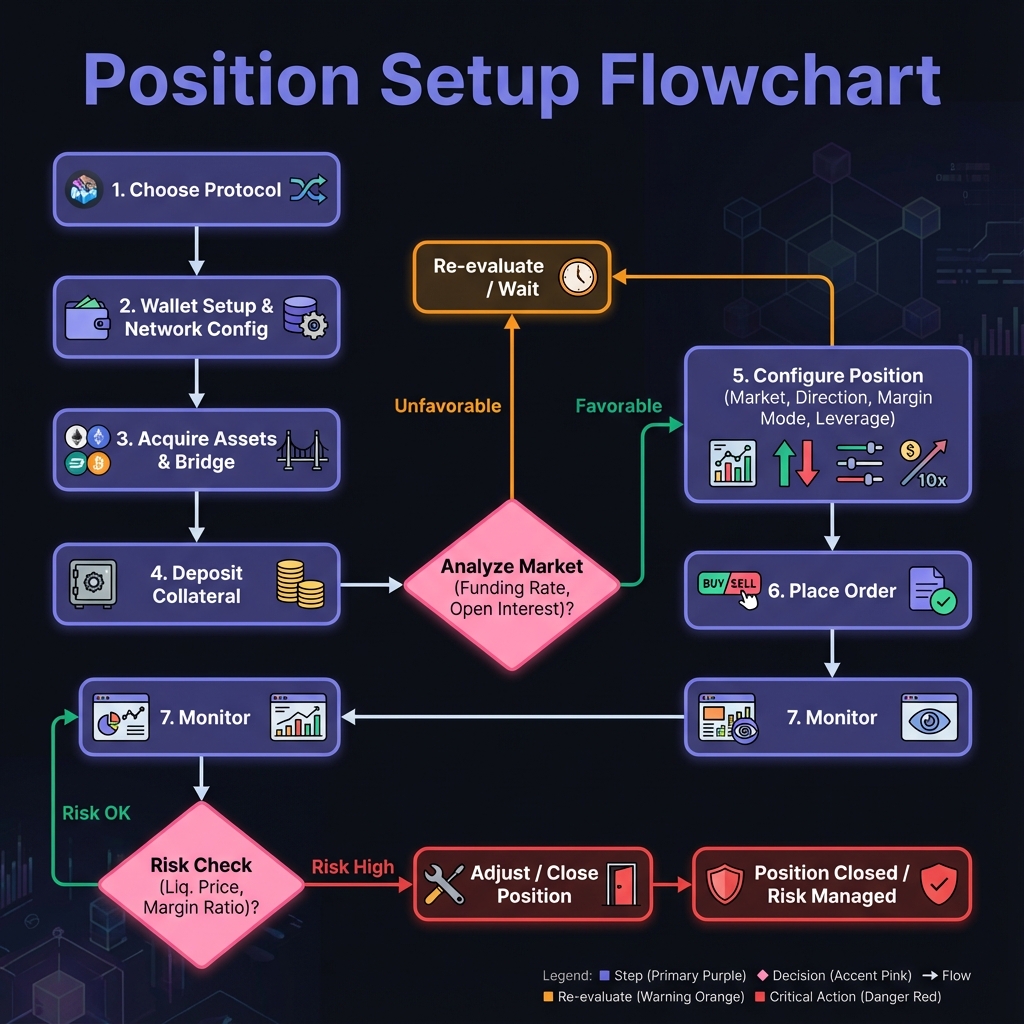

⚡ Step 7: Execute and Monitor
Execute Order
- Click "Place Order" or "Open Position"
- Approve transaction in wallet
- Wait for confirmation
- Position appears in "Open Positions"
Monitor Your Position
Key Metrics to Watch:
- Current Price: How far from entry?
- Unrealized P&L: Profit or loss?
- Liquidation Price: How close?
- Margin Ratio: Percentage of margin used
- Funding Rate: Current funding cost
Monitoring Frequency:
- Active Trading: Check every few minutes
- Swing Trading: Check daily
- Never: Set and forget (always monitor)

When to Close
Close Immediately If:
- Price hits stop loss
- Price hits take profit
- Funding rate becomes extreme
- Market conditions change fundamentally
Consider Closing If:
- Position is profitable and you're unsure
- Liquidation price getting close
- Better opportunity elsewhere
🎓 Beginner's Corner: Common First-Trade Mistakes
Mistake 1: Too Much Leverage
The Error: "I'll use 20x to maximize profits!"
The Reality: 20x leverage = 5% price move = liquidation. Very risky.
The Fix: Start with 3x-5x maximum.
Mistake 2: No Stop Loss
The Error: "I'll just watch it and close if it goes bad."
The Reality: Emotions take over, losses compound, liquidation happens.
The Fix: Always set stop loss before opening position.
Mistake 3: Ignoring Funding Rates
The Error: "Funding is only 0.01%, that's nothing."
The Reality: 0.01% per hour = 87.6% APR. On leveraged position, this is huge.
The Fix: Always check annualized funding rate.
Mistake 4: Cross Margin on First Trade
The Error: "Cross margin is easier, I'll use that."
The Reality: One bad trade can liquidate your entire account.
The Fix: Always use isolated margin for first trades.
Mistake 5: Trading Emotionally
The Error: "ETH is pumping, I need to get in now!"
The Reality: FOMO leads to bad entries, no stop loss, high leverage.
The Fix: Have a plan, stick to it, don't trade on emotion.
🔬 Advanced Deep-Dive: Position Management
Adding Margin
When to Add:
- Price moving against you but still confident
- Want to lower liquidation price
- Want to increase position size
How to Add:
- Navigate to position
- Click "Add Margin" or "Deposit"
- Enter additional amount
- Approve transaction
Effect: Lowers liquidation price, increases safety buffer.
Reducing Position Size
When to Reduce:
- Taking partial profits
- Reducing risk
- Market conditions changing
How to Reduce:
- Navigate to position
- Click "Close" or "Reduce"
- Enter amount to close (e.g., 50%)
- Approve transaction
Effect: Locks in profits, reduces exposure.
Trailing Stop Loss
Advanced Technique: Stop loss that follows price
How It Works:
- If price moves in your favor, stop loss moves up (long) or down (short)
- Locks in profits while allowing for more upside
Example:
- Entry: $2,500
- Initial Stop: $2,400
- Price moves to $2,600
- Trailing stop moves to $2,500 (break-even)
- Price moves to $2,700
- Trailing stop moves to $2,600 (locks in $100 profit)
For First Trade: Not necessary, but good to know exists.
📊 Real-World Example: Complete First Trade
Setup:
- Protocol: GMX V2 (Arbitrum)
- Market: ETH/USD
- Direction: Long
- Entry: $2,500
- Margin: $200 (isolated)
- Leverage: 5x
- Position Size: $1,000
Pre-Trade Analysis:
- Funding Rate: 0.005% per hour (acceptable)
- Open Interest: $500M (healthy)
- Liquidation Price: $2,000 (20% buffer)
- Stop Loss: $2,400 (4% risk)
Execution:
- Connect MetaMask (Arbitrum network)
- Deposit $200 USDC
- Navigate to ETH/USD market
- Select "Long", "Isolated Margin", "5x Leverage"
- Set stop loss at $2,400
- Click "Open Position"
- Approve transaction
- Position opened
Monitoring (After 24 hours):
- Current Price: $2,550
- Unrealized P&L: +$50 (2% gain)
- Funding Paid: $1.20 (24 hours × 0.005% × $1,000)
- Net P&L: +$48.80
- ROI: 24.4% on margin
Decision: Price hit first target, close 50% to lock profits, let 50% run with trailing stop.
🛠️ Calculate Your Position
Use this calculator to plan your first position:
🔑 Key Takeaways
- Start with simple protocols (Oracle pools) and major pairs (ETH, BTC)
- Always use isolated margin and low leverage (3x-5x) for first trades
- Check funding rates and open interest before opening
- Always set stop loss before executing
- Monitor positions actively, don't set and forget
- Start small—first trades are for learning, not profit maximization
- Have a plan and stick to it—don't trade emotionally
🚀 Next Steps
- Complete Exercise 4 to practice position setup
- Proceed to Module 2 to learn about specific protocols
- Start with a small test position ($50-100) to learn mechanics
- Join protocol communities for support and questions
Next Lesson: In Lesson 5, we'll explore Hyperliquid, the L1 performance leader.