Lesson 10: Risk Management and Position Protection
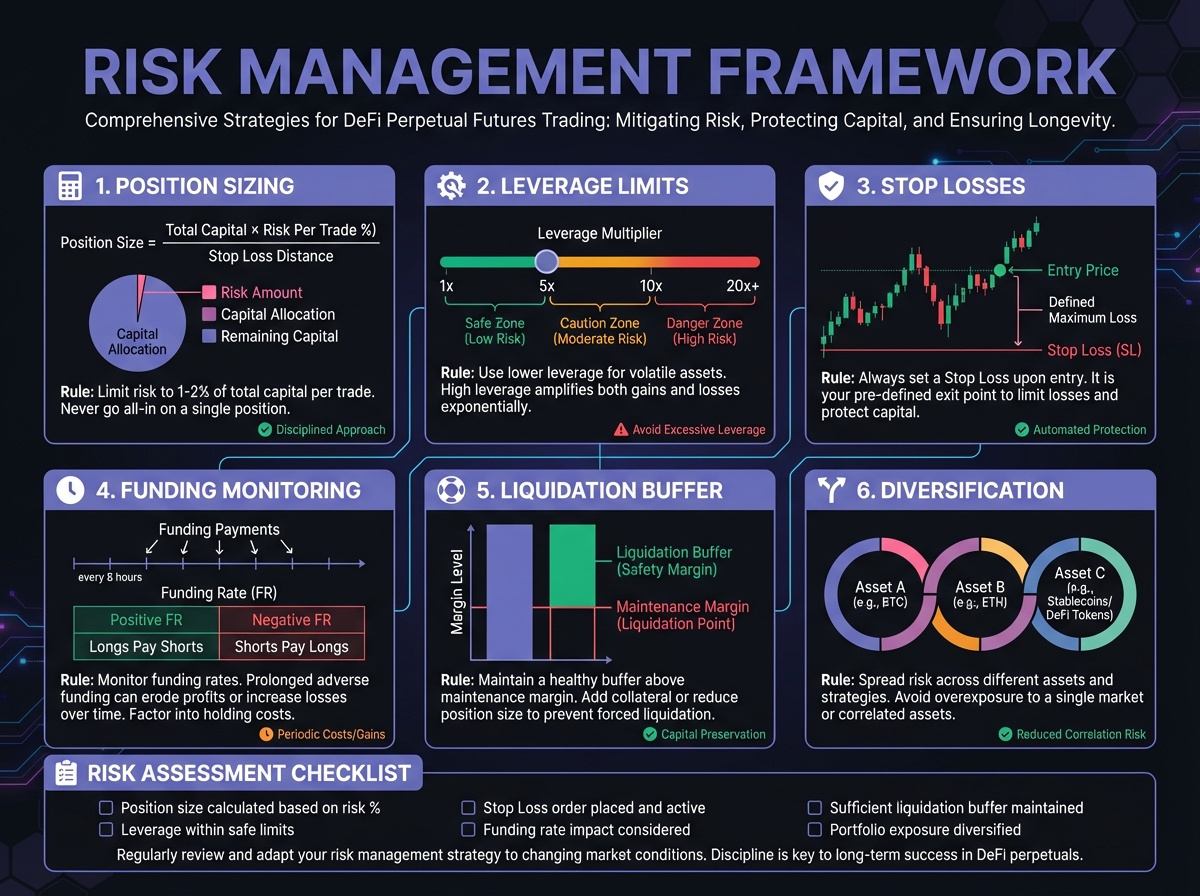
🎯 Core Concept: Risk Management is Non-Negotiable
The freedom of DeFi perpetual trading comes with significant risks. This lesson covers the most common mistakes, systemic risks, and how to protect yourself. Risk management is not optional—it's the difference between sustainable trading and catastrophic losses.
Why Risk Management Matters
Most traders lose money not because of bad trades, but because of:
- Poor risk management: No stop losses, excessive leverage
- Ignoring funding rates: High rates erode profits
- Misunderstanding liquidation: Not accounting for maintenance margin
- Cross-margin mistakes: One bad trade liquidates entire account
The Statistics: Studies show 70-90% of retail traders lose money. The difference? Professional risk management.
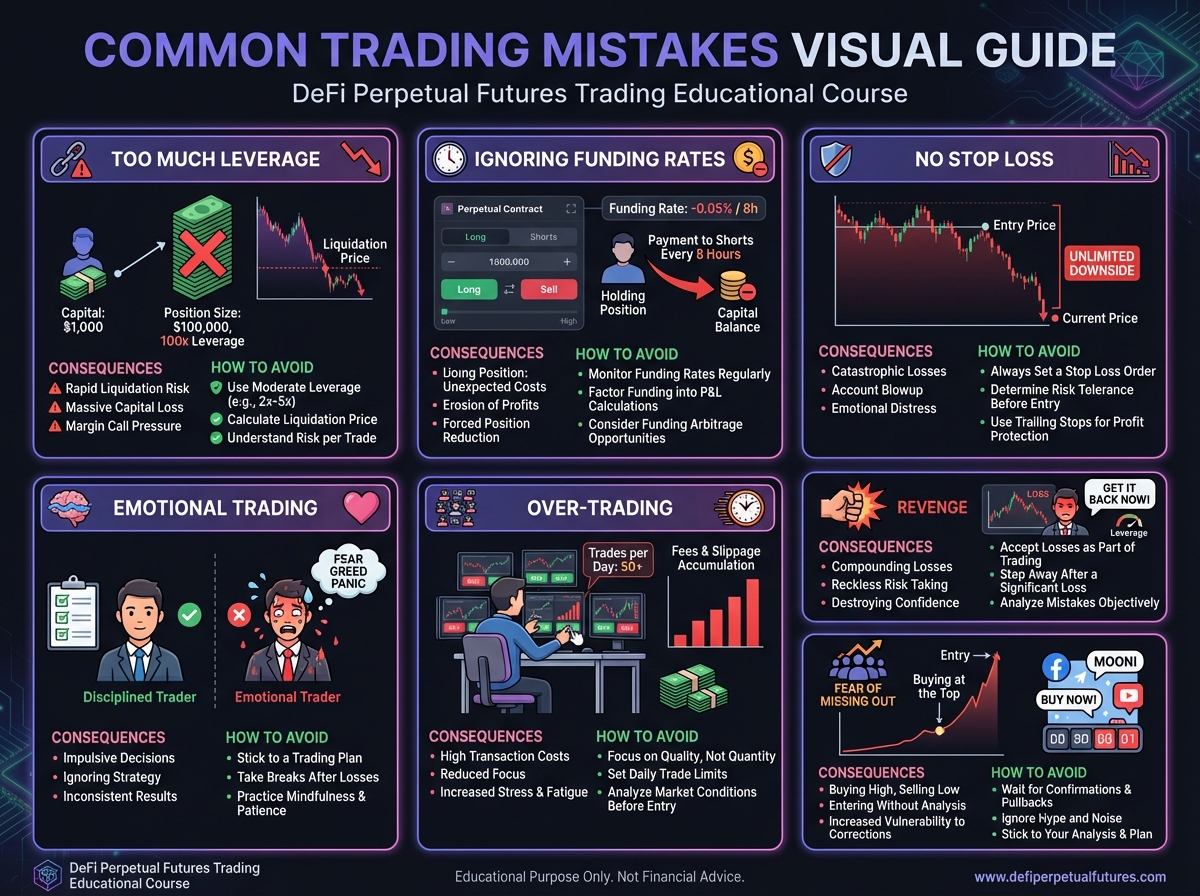
⚠️ Common Mistakes and How to Avoid Them
Mistake 1: Funding Rate Neglect
The Error: "Funding is only 0.01%, that's nothing."
The Reality:
- 0.01% per hour = 87.6% APR
- On 10x leverage, calculated on notional size
- 0.2% per hour = 4.8% per day = 48% of margin per day
Example:
- Position: $10,000 notional (10x on $1,000 margin)
- Funding: 0.2% per hour
- Daily cost: $10,000 × 0.002 × 24 = $480/day
- On $1,000 margin: 48% loss per day (even if price flat)
The Fix:
- Always check annualized funding rate
- If >50% APR, reconsider the trade
- Use spot position if funding too high
- Monitor funding rate changes
Mistake 2: Misunderstanding Liquidation Buffers
The Error: "With 10x leverage, I'm safe until price drops 10%."
The Reality:
- Maintenance margin required (e.g., 5%)
- Liquidation occurs before 10% drop
- Usually around 9-9.5% (depends on protocol)
Example:
- Entry: $100, 10x leverage
- You think: Safe until $90
- Reality: Liquidated at ~$90.50-$91.00
The Fix:
- Use protocol's liquidation calculator
- Maintain 20-30% buffer above liquidation price
- Don't estimate—calculate exactly
- Monitor margin ratio closely
Mistake 3: Cross-Margin Contagion
The Error: Using cross margin for "simplicity" while trading correlated assets.
The Reality:
- One bad position can drain entire account
- Correlated assets move together
- Combined drawdown = account liquidation
Example:
- Account: $1,000 USDC (cross margin)
- Long ETH: $5,000 position
- Long ETH-beta altcoin: $5,000 position
- Altcoin crashes 20% → Account equity drops
- ETH also drops (correlated) → Entire account liquidated
The Fix:
- Use isolated margin for volatile assets
- Use cross margin only for hedging strategies
- Never use cross margin for correlated positions
- Monitor portfolio health factor

Mistake 4: Chasing the Liquidity Mirage
The Error: "High volume = deep liquidity, I'm safe."
The Reality:
- Wash trading inflates volume
- Real order book depth may be thin
- Large orders suffer massive slippage
The Fix:
- Check Open Interest (OI) to Volume ratio
- Healthy: Balanced OI and volume
- Red flag: High volume, tiny OI (wash trading)
- Test liquidity with small orders first
🛡️ Liquidation Prevention Strategies
Strategy 1: Maintain Safety Buffers
The 20-30% Rule:
- Keep liquidation price 20-30% away from current price
- For 10x leverage: Maintain margin ratio >15%
- For 5x leverage: Maintain margin ratio >25%
Calculation:
- Entry: $2,500
- Leverage: 5x
- Liquidation: $2,000
- Current: $2,400
- Buffer: ($2,400 - $2,000) ÷ $2,400 = 16.7% (too close!)
Action: Add margin or reduce position size
Strategy 2: Use Stop Losses Religiously
Why Critical:
- Limits maximum loss
- Prevents emotional decisions
- Protects capital
How to Set:
- Identify technical support/resistance
- Set stop loss below support (long) or above resistance (short)
- Ensure stop is 20-30% from entry (for 5x leverage)
- Never move stop loss against you
Example:
- Entry: $2,500
- Support: $2,400
- Stop Loss: $2,390
- Max Loss: $110 (4.4% of position)
Strategy 3: Position Sizing
The 1-5% Rule:
- Risk only 1-5% of total capital per trade
- For $10,000 capital: Max risk = $200-500 per trade
- Prevents single trade from destroying account
Calculation:
- Total Capital: $10,000
- Risk Per Trade: 2% = $200
- Entry: $2,500
- Stop Loss: $2,400 (4% risk)
- Position Size: $200 ÷ 0.04 = $5,000
- Margin Needed: $5,000 ÷ 5x = $1,000
Result: $1,000 margin, $5,000 position, $200 max loss
Strategy 4: Add Margin Proactively
When to Add:
- Price moving against you but still confident
- Want to lower liquidation price
- Want to increase safety buffer
How to Add:
- Navigate to position
- Click "Add Margin"
- Enter additional amount
- Verify new liquidation price
Effect: Lowers liquidation price, increases buffer

🔒 Systemic Risk Protection
Oracle Risk Mitigation
The Problem: Oracle latency or manipulation
Oracle-Based DEXs (GMX):
- Risk: Stale prices = arbitrage opportunities
- Mitigation: Use protocols with low-latency oracles (Pyth, Chainlink Data Streams)
- Monitor: Check oracle update frequency
CLOB DEXs (Hyperliquid):
- Risk: On-chain price wicks = liquidations
- Mitigation: Maintain larger safety buffers
- Monitor: Check order book depth
Protection:
- Diversify across protocols
- Use protocols with multiple oracle sources
- Monitor for unusual price movements
Bridge Risk Mitigation
The Problem: Bridge hacks or failures
Examples:
- Hyperliquid bridge (multisig)
- Cross-chain bridges (various)
Protection:
- Minimize bridge exposure
- Use insured bridges when available
- Don't leave funds in bridges
- Monitor bridge security
Best Practice: Bridge only what you need, when you need it.
Smart Contract Risk Mitigation
The Problem: Protocol exploits or bugs
Protection Checklist:
- Multiple independent audits
- Active bug bounty program
- Insurance fund exists
- Protocol has been battle-tested
- No recent major incidents
Red Flags:
- Single audit from unknown firm
- "Audit in progress"
- No insurance fund
- Recent exploits
Best Practice: Use only well-audited, established protocols.
📊 Margin Management Best Practices
Isolated vs. Cross Margin Decision Tree
Use Isolated Margin When:
- Trading volatile assets
- Testing new strategies
- First-time trades
- High leverage (>10x)
- Uncorrelated positions
Use Cross Margin When:
- Hedging strategies (Long BTC, Short ETH)
- Low leverage (<5x)
- Blue-chip assets only
- Active portfolio management
- Understanding correlation risks
Portfolio Health Monitoring
Key Metrics:
- Portfolio Health Factor: Overall account safety
- Individual Position Health: Each position's margin ratio
- Correlation Exposure: How correlated are your positions?
- Liquidation Distance: How close to liquidation?
Monitoring Schedule:
- Active Trading: Check every few minutes
- Swing Trading: Check daily
- Never: Set and forget
Alert Thresholds:
- Health factor < 1.5: Warning
- Health factor < 1.2: Danger
- Within 5% of liquidation: Critical
🎓 Beginner's Corner: Your Risk Management Checklist
Pre-Trade Checklist
Before Opening Any Position:
- Funding rate checked (<0.05% per hour acceptable)
- Liquidation price calculated
- Safety buffer verified (20-30%)
- Stop loss set
- Position size appropriate (1-5% of capital)
- Leverage conservative (3x-5x for beginners)
- Margin mode: Isolated (for first trades)
- Risk per trade calculated
During-Trade Checklist
While Position is Open:
- Monitor margin ratio daily
- Check funding rate changes
- Verify stop loss still appropriate
- Distance to liquidation checked
- Portfolio health monitored
Emergency Response Plan
If Approaching Liquidation:
- Option 1: Close position (cut losses)
- Option 2: Add margin (if still confident)
- Option 3: Reduce position size (partial close)
Decision Framework:
- If stop loss hit: Close immediately
- If within 5% of liquidation: Add margin or close
- If funding rate spikes: Reassess or close
🔬 Advanced Deep-Dive: Professional Risk Systems
Multi-Position Risk Management
Portfolio Approach:
- Total portfolio risk: <10% of capital
- Individual position risk: 1-5% each
- Correlation analysis: Don't over-concentrate
- Diversification: Across assets and protocols
Example Portfolio:
- Position 1: $5,000 (2% risk)
- Position 2: $3,000 (1.5% risk)
- Position 3: $2,000 (1% risk)
- Total Risk: 4.5% of capital
Automated Risk Management
Bot Features:
- Monitor all positions
- Alert on margin ratio thresholds
- Auto-close if stop loss hit
- Rebalance if delta drifts
- Track funding rate changes
Considerations:
- Development costs
- Monitoring infrastructure
- Risk of bugs
- Gas costs
Insurance and Hedging
Protocol Insurance:
- Some protocols have insurance funds
- Check coverage limits
- Understand what's covered
External Hedging:
- Hedge perp exposure with spot
- Use options for protection
- Cross-protocol hedging
📊 Real-World Example: Complete Risk Management
Setup:
- Capital: $10,000
- Risk per trade: 2% ($200)
- Strategy: Swing trading ETH
Position 1:
- Entry: $2,500
- Margin: $1,000 (5x leverage)
- Position: $5,000
- Stop Loss: $2,400
- Liquidation: $2,000
- Max Loss: $200 (2% of capital) ✓
Risk Management:
- Safety Buffer: 20% above liquidation ✓
- Stop Loss: Set and respected ✓
- Funding Rate: 0.01% per hour (acceptable) ✓
- Margin Mode: Isolated ✓
- Monitoring: Daily checks ✓
Result: Even if liquidated, maximum loss is $200 (2% of capital), not entire account.
✅ Pre-Trade Risk Assessment Tool
Use this interactive checklist before opening any position:

Launch Risk Assessment Checklist →
🔑 Key Takeaways
- Funding rates can be extremely expensive—always check annualized rates
- Liquidation occurs before simple leverage math suggests—use calculators
- Cross margin is dangerous for correlated assets—use isolated margin
- High volume doesn't mean deep liquidity—check OI to volume ratio
- Maintain 20-30% safety buffer above liquidation price
- Always set stop losses before opening positions
- Risk only 1-5% of capital per trade
- Monitor positions actively, never set and forget
- Diversify across protocols to reduce systemic risk
- Use only well-audited, established protocols
🚀 Next Steps
- Proceed to Lesson 11 to learn about emerging trends
- Complete Exercise 10 to design your risk management framework
- Implement your risk management checklist
- Start with small positions to practice
Next Lesson: In Lesson 11, we'll explore advanced topics and emerging trends.